There is nothing more adorable than cute little puppies. But, drawing a puppy takes lots of effort as it is not easy to get their puppy eyes or their cute expression into a drawing. Follow the step-by-step instructions provided below and you will end up with a perfect little puppy on paper.
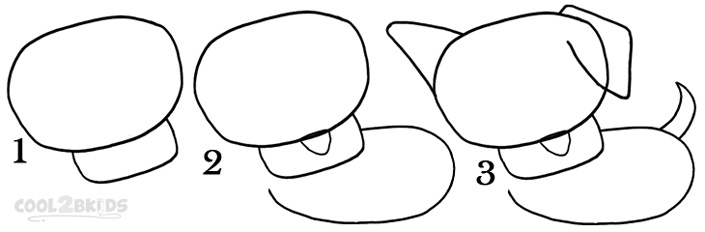
How To Draw a Puppy Step 1
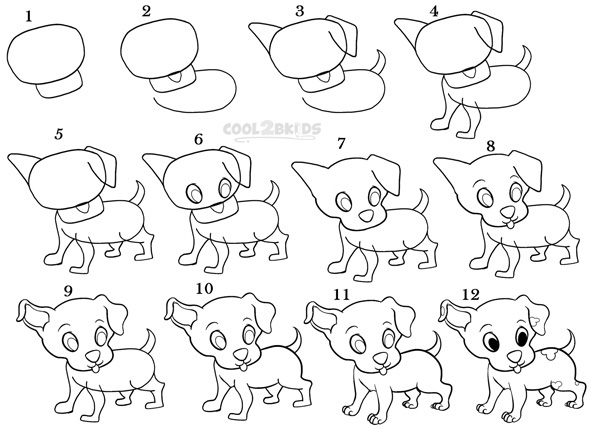
Step 1
- Begin your drawing with a rough oval followed by a somewhat rectangular shape with rounded corners attached to the lower part of the oval. Both of these shapes will later become the puppy’s head. Make sure that the left side of the oval is a bit lower than the right side. (Picture 1)
- Draw a tiny triangle exactly at the center of the part of the oval cut by the rectangle.
- Next, make a reverse “C” with long sides that touches the rectangle drawn in the earlier step for the basic outline of the body. (Picture 2)
- Now add a pointy tail at the back of the “C”, followed by the outlines of the two ears at the top of the head (oval) as shown in picture 3.
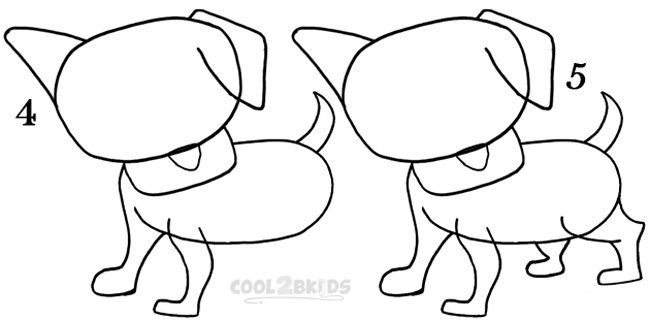
How To Draw a Puppy Step 2
Step 2
- Now it is time to start working on the legs and paws, beginning with a rough sketch of the front legs (see picture 4)
- Next, draw the two hind legs as shown in picture 5 with just the lower part of the right hind leg showing.
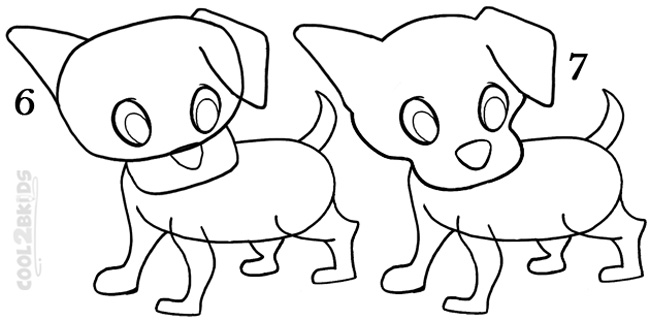
How To Draw a Puppy Step 3
Step 3
- Draw the eyes at the lower part of the head (the oval you drew in step 1), just above the rectangle. Now draw two large pupils. (Picture 6)
- Carefully erase the part of the oval between the sides of the rectangles as well as the parts cutting across the two ears (picture 7). Make sure not to erase the nose you drew in step 1.
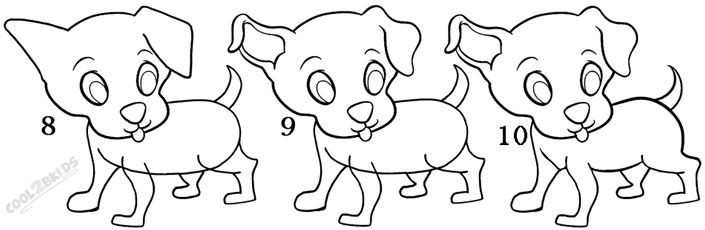
How To Draw a Puppy Step 4
Step 4
- See picture 8 to make a cute mouth with a tiny tongue sticking out.
- Add two cute eyebrows over the eyes.
- Work over the outlined ears to make them more realistic, drawing curvier lines and double lines to depict the tiny ears. Don’t forget to erase the earlier lines. (Picture 9)
- Erase the parts of the “C” (you made for the body) that runs through the legs. Work as shown in picture 10 to make the body look more realistic. You can even redo the tail to make it narrower and pointier.

How To Draw a Puppy Step 5
Step 5
- Erase the ends of all four legs to draw four paws as shown in picture 11.
Fill the pupils with black and add a few lines to indicate some color highlights (picture 12) in the body and head of your puppy and you are done.
Draw a Puppy Step By Step


