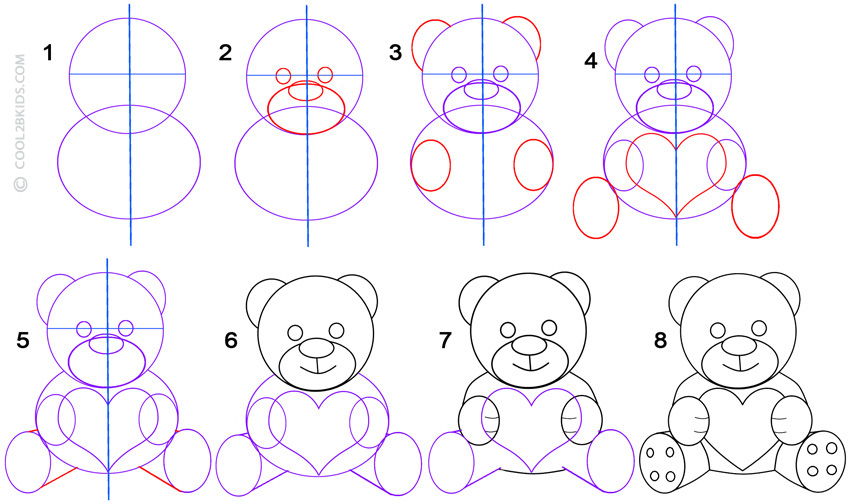
How many times did you have to make a last minute mothers’ day or birthday card because you lost track of the month and date? It is not an easy job to make a pretty greeting card within half an hour as the shortage of time is sure to take a toll on your handiwork. So, here is an easy step by step teddy bear drawing with a heart that will come handy on such occasions.
Step 1
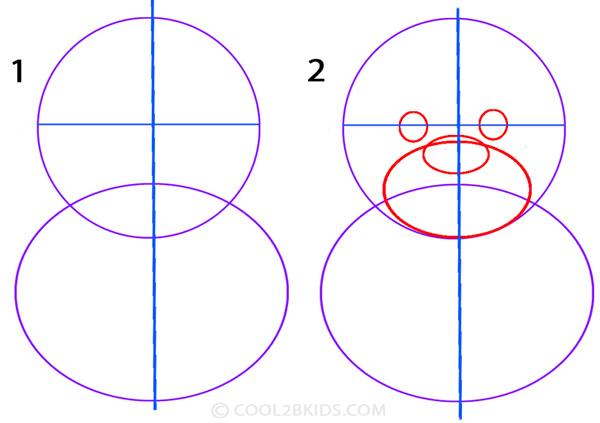
How To Draw a Teddy Bear Step 1
- Begin your drawing by making a cross. Use a compass to draw a circle with the point of intersection of the two straight lines as the center (Picture 1).
- Now, draw a slightly larger oval as shown in the first picture.
- Next, check picture 2 to draw the eyes, snout and nose with different sizes of circles and ovals. Make sure to keep the oval drawn for the snout below the horizontal line forming the cross.
Step 2
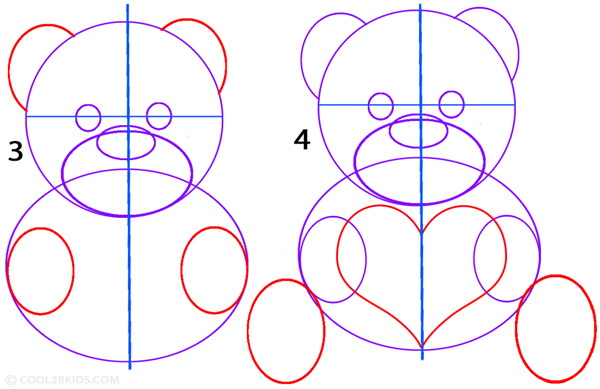
How To Draw a Teddy Bear Step 2
- Draw two half circles on either side of the head for the ears (picture 3).
- Now, make one small oval on each side of the large oval made in step 1 (for the paws).
- Next, make two more, slightly larger ovals adjoining the largest one for the legs (Picture 4).
- Now, it is time to draw a neat heart in your teddy’s paws. Make sure that the two halves of the heart are on either sides of the perpendicular line forming the cross drawn in step 1. This way, it will be exactly at the center.
Step 3
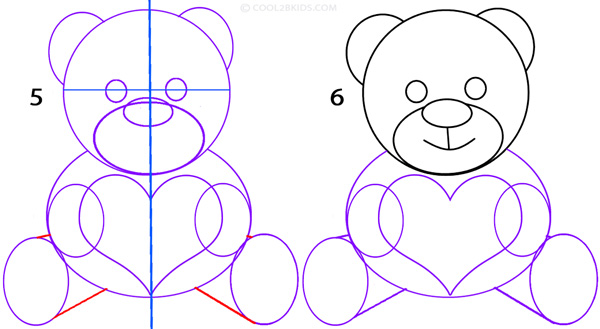
How To Draw a Teddy Bear Step 3
- See picture 5 to erase the part of the large oval (drawn for the body) that overlaps the head and snout.
- Join the two ovals drawn in the last step for the legs with the body by two straight lines (picture 5).
- Now, carefully erase the cross drawn in the first step (picture 6).
- Erase any other part of the face overlapping with one another (such as the snout and nose).
- Next, draw the mouth by making a perpendicular line followed by a curved one at its base (Picture 6).
Step 4
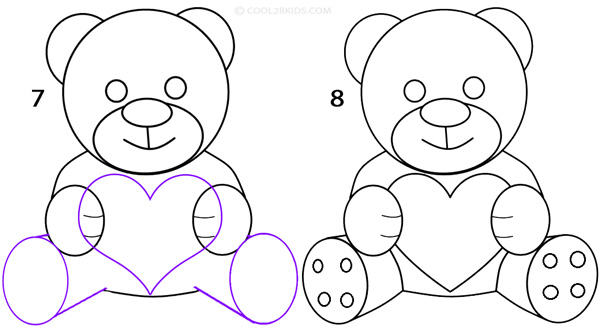
How To Draw a Teddy Bear Step 4
- See picture 7 to redo the shoulders of your teddy to make them a bit squarish instead of round. Also, erase the part of the body running through the legs.
- Add two small lines inside the small ovals made for the paws to make them look more real (picture 7).
- See picture 8 to give the final touches to the legs by adding four small circles under the paws.
- Now erase the part of the heart running through the front paws and your cute teddy bear drawing is done. Now all that is left to do is writing the name of whomever you are making the card for and you are set for the special day.
How To Draw a Teddy Bear Step by Step


I think that it kind of worked but to me it need more detail than that because it was hart to fallow a little bit. and i think that you should put more images on this site to help the kids because a lit of them do not read the things that you put of there to help them draw you need to put it into the images that you put on this site.but i relay like it cuz it does help with something that you need to draw just not all of them. but that is all that i am going to say because it is not my site i am just a person that thinks that this could do better. and that you should change the things that i said because it is true that some people do no do that so put more detail in the images not the words that you put to help them draw it.