The symmetric shape and unique patterns of snowflakes have fascinated kids and adults alike over a long time. Drawing a snowflake is not as easy as it sounds as it can be quite tricky to achieve the perfect symmetrical arms along with the intricate designs. Following the below mentioned steps can make your job easy.
Step 1

How To Draw a Snowflake Step 1
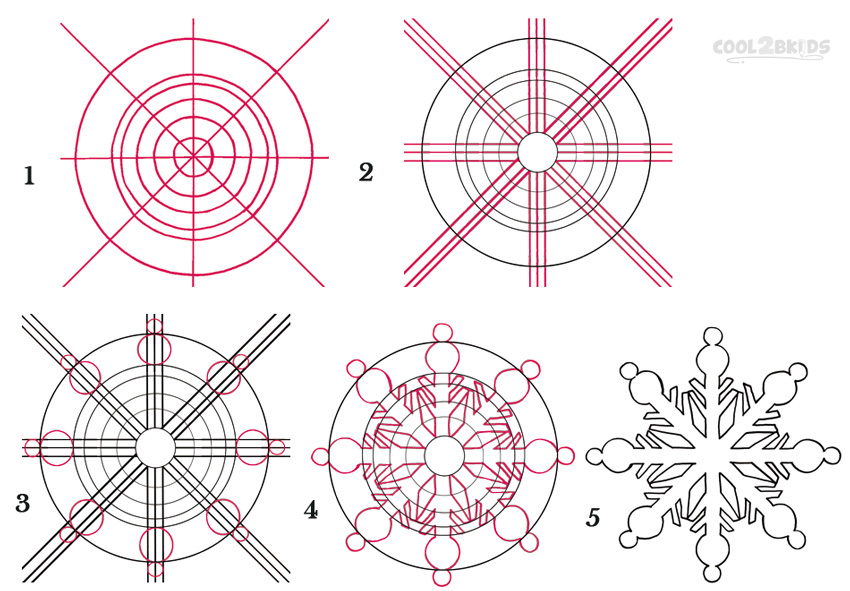
- Start your drawing by making a large neat circle using a compass. Then, make 5 smaller circles within the first one (as shown in picture 1), with all the circles having a single origin or center. You can use circular objects like bottle caps of different sizes to draw the circles, but using a compass is recommended as it makes it easier to draw multiple circles with the same center.
- Now, see picture 1 to draw a cross with the two arms cutting through each other at the centre of the circles.
- Next, draw a large “X” with the two arms meeting each other at the same center (picture 1).
Step 2
How To Draw a Snowflake Step 2
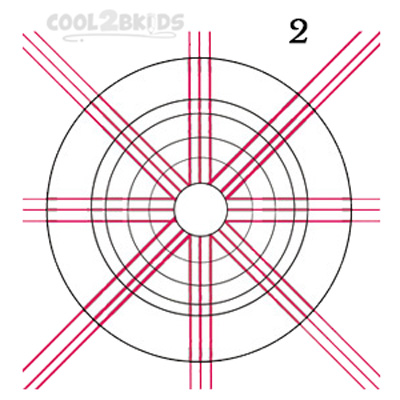
- Begin this step by erasing the parts of the lines running through the smallest circle at the center (picture 2).
- See picture 2 to add two straight lines on either sides of each of the arms of the cross and “X” (make sure to keep uniform distance from the line in the middle). The red lines show the new lines to be drawn along with the straight lines drawn in the earlier step. These will later be the arms of your snowflake.
Step 3
How To Draw a Snowflake Step 3
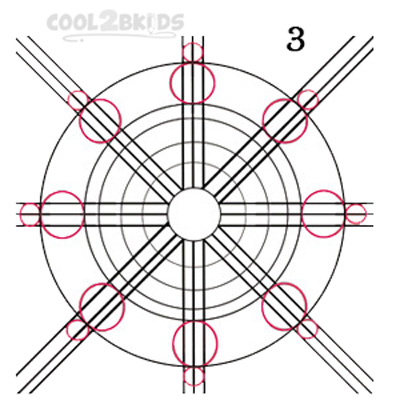
- Mark the parts of each of the 3 parallel straight line sets intersected by the largest and the second largest circles.
- Then, take the middle straight line as the diameter to draw a circle over each intersection, in such a way that the circumference of the small circles touches those of the largest and second largest ones.
- Now, draw one more circle (even smaller than those you just drew) on each of the arms, outside of the largest circle, making sure that their circumference touches that of the largest circle as well as the small ones drawn over the intersections.
- The middle straight line will be the diameter of the smallest circles while their circumference will remain with the other two straight lines running parallel with the middle one.
Step 4
How To Draw a Snowflake Step 4
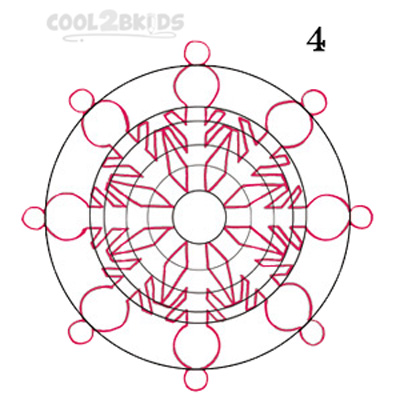
- Now, carefully erase all the straight lines (the cross and the “X” along with the lines running parallel to them), leaving the parts of the lines parallel to the arms of the cross and “X” inside the second largest circle (the arms of the cross and “X” should be erased completely). Make sure not erase any of the circles.
- See picture 4 to draw two small angled lines from both sides of each of the “arms” of your snowflake.
Step 5
How To Draw a Snowflake Step 5
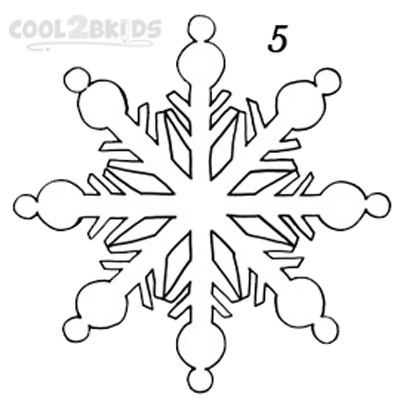
- Your drawing is almost done as all that is left to do is erasing all the circles drawn in step 1. You need to be careful and patient while working on this step; otherwise, you might end up erasing some part of your snowflake pattern.
How To Draw a Snowflake Step by Step


