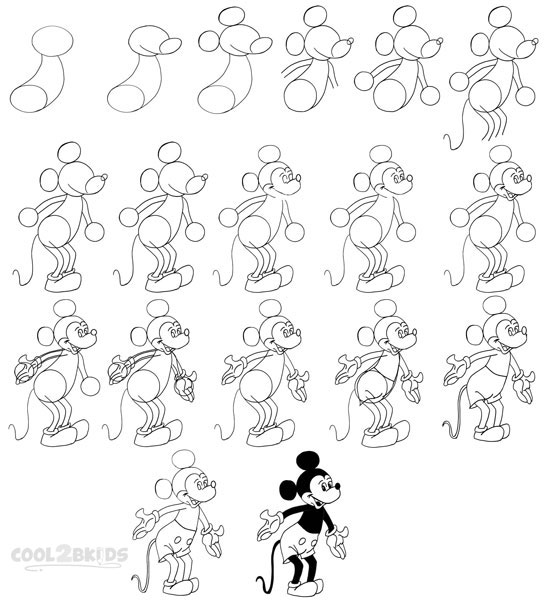
Here are the step by step instructions for drawing the basic structure of your Mickey Mouse:
Step 1
How To Draw Mickey Mouse Step 1
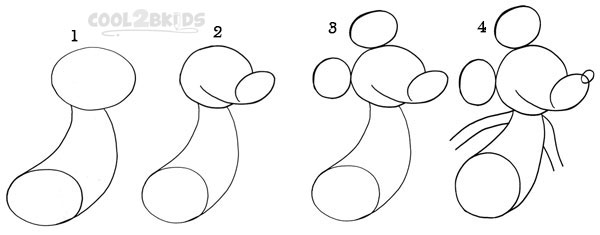
- Begin by drawing two circles of the same size and connecting them at the edge by two curved lines (picture 1). The upper circle will be Mickey’s head.
- Next, draw a small oval intersecting the upper circle along with a line extending from the lower end of the oval (picture 2). These will be the snout and mouth.
- Draw two more same-sized ovals over the head for the two trademark ears (picture 3).
- Add a tiny black nose at the top of the nozzle followed by two arms at the outer sides of the curved lines joining the first two circles (picture 4).
Step 2
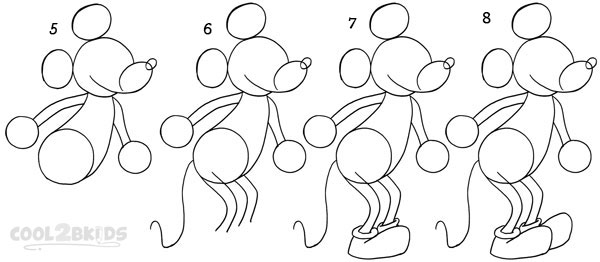
This step describes the basics for drawing the hands and lower body:
How To Draw Mickey Mouse Step 2
- Begin by drawing two small circles for the hands at the end of each arm you drew in the earlier step (picture 5)
- Then draw two legs, in the similar way you drew the arms, from the lower circle (picture 6). Add a curled line at the left of the circle for your Mickey’s tail.
- Draw a large, high ankle Mickey Mouse shoe at the end of his right leg (picture 7) followed by the other one for the left foot (picture 8). Don’t forget the double-lined rim.
Step 3
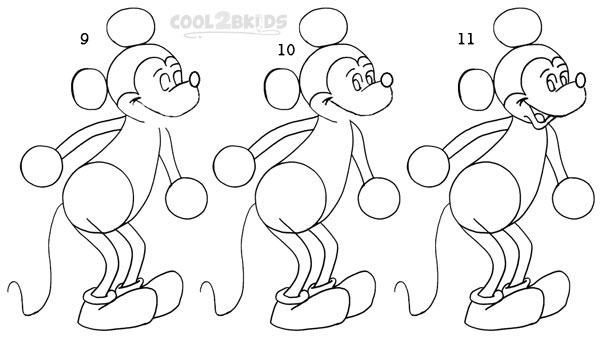
The face is one of the trickiest parts of drawing any character and that is what you will be doing in this step:
How To Draw Mickey Mouse Step 3
- Start with drawing the eyes and eyebrows followed by a tiny stroke of pencil at the end of the line you drew earlier for the mouth (picture 9). This represents a smiling face.
- Then, erase the part of the snout overlapping the face and mouth (picture 9). Try to be accurate when working on this step as the snout is a key feature of Mickey Mouse’s face and any mistake here may ruin the whole picture.
- One of the simplest steps, here you will just be adding the pupils to your Mickey’s eyes (picture 10).
- Erase the lower part of the upper circle (head), just below the snout to make the mouth with a tiny tongue (picture 11). The head of your Mickey Mouse is complete now.
Step 4
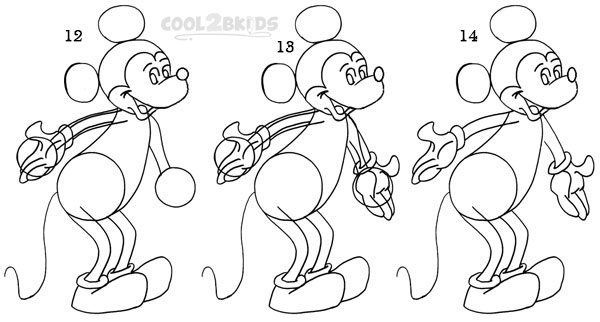
Now, it is time to work on the hands:
How To Draw Mickey Mouse Step 4
- Begin by replacing the circle you made earlier at the end of the right arm with a gloved hand (picture 12) followed by the left one drawn in the similar manner (picture 13)
- You can erase the circles formerly representing the hands once both the gloved hands are done (picture 14)
Step 5
The last step where you will be working on all the remaining parts of your drawing:
How To Draw Mickey Mouse Step 5
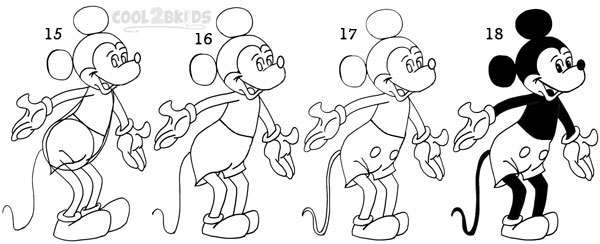
- Replace the lower circle you drew in the first step with Mickey’s characteristic trousers (Picture 15) and then neatly erase the circle (Picture 16). Add a few lines to highlight the folds and creases of the trousers.
- Finish the curled tail by adding another similar line beside the existing one so it looks more real (Picture 16)
- Add two buttons at the front of his trousers (picture 17)
Finish the drawing by filling the ears, body, hands, legs and tail with black (picture 18), and your Mickey Mouse is ready.
Mickey Mouse


Great instructions!!!
I did it !!!
Thank you